A Successful UX Design Process

Having a well defined process in how you craft a User Experience is key to producing the best product possible. For any UX Pro out there creating complex User Flows a well thought out process will win the day. Without jumping too far into the weeds I will outline my UX Process end-to-end while including a small example from a recent personal project of mine.

Find the Challenge

The first step is identifying the challenge you face in producing a product. In my case it was how do I make it so Car enthusiasts can connect with one another in the most simple way possible and do so in a safe and fun environment?

UX Discovery, the Challenge is Met…

Once I’ve identified the challenge, I must discover the solution through a variety of means starting with User Research & Analysis. Typically at this point I’ll scour through any kind of Analytics tools like Google Analytics and/or Heat Maps to see where the interaction points are and decide what works and what doesn’t.

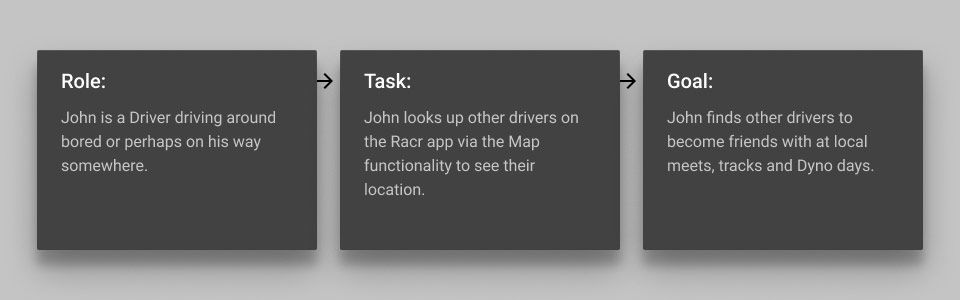
From here I’ll jump into creating the User Journey by defining the user’s Role, Task and overall Goal. Within the Journey we’ll determine that user’s story by creating their persona. In my example we decided to use Geo Location as our method to drive users to meet.

My method of choice is typically User Interviews with Key Stakeholders such as Product Owners or Store Managers if the application is B2B but in this example it’s a C2C experience so we have to jump out into the field and talk to Car Enthusiasts in their community at Car Meetups and Car Shows. I’ve also used online surveys like Survey Monkey to gather valuable feedback in the past as well.

Normally I’d go a little further and provide a User Flow/Sitemap but for this example it will be left out for the protection of the IP but I did want to mention it since it is an important step within the process.

UX Design & the Tools that Drive It

The Discovery is now mostly complete so it’s time to put our design hats on and get to work. In many of my roles I’ve had to work at a very fast pace to provide a vision and the best tool for providing a high level of interactivity while maintaining a good visual experience was Axure.

Axure provides both a solid set of Design components and an unparalleled set of Interaction Design tools to get the job done quickly. Sometimes this comes at the sacrifice of High Fidelity but there are good workarounds within the application to get to that point of showing well.

However, even with all of that said for this project, I decided to go with my favorite new UX tool in Figma. Yes, I know Sketch is the hottest and greatest for pure Visual Design and High Fidelity but in my opinion, Figma can do everything Sketch can and it even beats it out in many areas. Figma is like Sketch+Invision+Axure Lite.

Here’s a few bullets on what I love about Figma;

  • Design at levels of High Fidelity.
  • Cloud Based Design that let’s multiple Designers work on the same project without having to waste time on messy file transfers.
  • Real-time Collaborative tools for sharing input.
  • A Slew of Great Plugins & Components.
  • Prototyping Capabilities similar to Framer X.
  • Great Code & Asset Sharing Options.
  • It’s available for both the PC & Mac.
  • It’s Free to Use (with a few limitations).

Design Concepts & Passing of the Torch

Now that the tool of choice was decided on we get to the design concepts themselves showing a few touch points within the App. To keep things simple and to again protect my IP, I’m only showing a few screens.

Designs

From here, I’d use Figma’s code inspector/share tool to grab selections of the code I’d need, mainly for the CSS side of things as I’d be using a Frontend Framerwork such as Bootstrap to create the HTML markup. I could go into my Frontend development process but I’ll save that for another article.

From there it’s onto the development team to make the App come to life. Hopefully this provides a good glimpse into my UX Design process. Feel free to comment with questions if you have them. I know there are some things I’ve left out but as I said I didn’t want to go too far down the rabbit hole, especially on a project in which I can’t show all its features. 🙂

How to Keep Tabs on Your SEO in 2016 – Part 2

Welcome to Part Two of our SEO tips and tricks! To kick off the second half, we’re going to continue to provide you with tips on how to boost your SEO for this year.

Keywords, Keywords, Keywords

Keywords aren’t as important as they used to be, simply because Google has gotten smarter in interpreting meanings of said keywords. In the past, you had to write the same keyword several times in your content (including the meta description) for your article to pop up on the rankings, but that’s no longer the case. You can definitely use relevant and similar keywords nowadays in your works, because search engines are be able to scout out words that relate to your intent of the article.

It’s also important to keep in mind that 75 percent of search queries are between three and five words long, so you should write headlines with the knowledge in mind. One or two word queries, like “candy,” is going to bring about a plethora of websites that may not have anything to do with what the user is looking for. However, “ideal candy for Halloween” will narrow the search, more than likely pulling up pages that will satisfy the user.

Images Should to Be Unique

Nowadays, it’s easy to pull most images from a Google search. Thousands (maybe millions) of sites refer to stock images, but it’s best to keep in mind that using original images (i.e. from your camera, phone, or computer) for your content is always best for your site.

Social Marketing is Essential

Yes, Social Media is as big as ever, and it dominates the Internet. It’s important to keep in mind that your content needs to be shared and delivered through various Social Media outlets such as Facebook, Twitter, Instagram, and more. According to SEONick, 76 percent of marketers use Social Media to boost SEO. So your Facebook posts and Tweets are playing a big role in ranking your content highly on Search Engine Results Pages (SERPs).

Videos

Videos have been the future for quite awhile now. A lot of content, including news, reviews, and more, are found in videos. People have taken a liking to them, meaning that embedding videos into your content is going to earn you some brownie points on the SERPs. According to Marketing Land, 62 percent of all Google searches are videos. In fact, according to Quick Sprout, videos are over 50 times more likely to appear on the first page of search results. Keep in mind that the number of views on your video will be taken to account when ranking, so make sure to upload some unique, relevant, and engaging video content.

Voice Search

Voice search is incredibly important nowadays, since more users are relying on Siri, Cortana, or OK Google for their information. Voice search simply proves to be safer and more efficient for those on the go, and, like Social Media, is dominating the west But what is voice search often used for? According to Google Study, voice search is mostly used for directions, whether it be for recipes or driving. So when you’re developing content and writing those headlines, you should consider optimizing for voice search. You can find out how at Perfect Pitch Concepts.

Type in hotels, and you'll notice that the top-rated hotels near you will be ranked highly.
Type in hotels, and you’ll notice that the top-rated hotels near you will be ranked highly.

Local SEO

Finally, Local SEO is as important as anything else in this day and age. It’s a trend that just keeps… growing, believe it or not. When you want to be ranked by Google, location becomes important, as your content will show for the audience relative to your subject. So make sure to have location-specific keywords whenever you can, i.e. your business’s address, etc.

To summarize, it’s important to keep in mind the following if you’d like to gain the upperhand in SEO:

  • Write original and relevant content that will wow your audience.
  • Optimize your content for mobile devices, as more people are relying on them nowadays.
  • Write larger content, averaging between 1,200 and 1,500 words.
  • Keywords aren’t as important nowadays, but ensure that your content remains your intent.
  • Since social media is so prevalent nowadays, spread your content!
  • Uploading and embedding videos will certainly boost your SEO.
  • Voice search is quite important, especially when most voice search results relate to directions.
  • And finally, users are exploring local content ever more, so it’s best to include your location and anything relevant to your location in the content.

With these tips, you should definitely be getting ahead of the SEO game, at least in the year 2016.

How to Keep Tabs on Your SEO in 2016 – Part 1

Today’s SEO is becoming more important than ever, but the algorithms change at a constant rate. According to AMA.org, Google undergoes at least 500 algorithm changes a year. Due to the changes in the SEO algorithm, it’s always good to know how to conform to these changes. Well, we’re here to help with that. Here are some basic rules to keep in mind when you’re writing content during 2016:

Write Original and Relevant Content

I’m going to start with the most important rule in SEO: write original and relevant content. This rule really hasn’t changed all that much over the years, but the algorithm behind it has. Because of this, it’s important to keep the basics in mind; of course having original content was important, but its importance has grown exponentially. After all, there are a ton of articles out there that have been published. Sad to say, no one’s willing to view the same content. If they find a creator’s video and gather the information they’ve been seeking, your content will remain unseen.

Editorial Calendar
(Image Courtesy of WordPress.org)

When it comes to catering to people, it’s helpful to create an editorial calendar that keeps track of your content. This way, you’re also able to gather the interests of your audience. You are allowed, for instance, to curate content, as long as you provide credit where credit is due and elaborate on the curated content in order to make it original.

Original Content
This here’s an example of original content: a review exclusively written for a video game.

When you’re writing original content, you must keep in mind that your title must be parallel to the information you’re feeding your audience. For instance, say that your title is, “How to Wash a Puppy.” People are going to expect instructions on washing a puppy. If they click on the link and instead see instructions on washing a cat, you know they’re going to smack that “Back” button, which is going to hurt your site more than help. After all, Google keeps track of how the users interact with the site. This is why relevancy is key to ranking nowadays as search engines are a lot smarter than in previous years.

It’s also essential to understand that you shouldn’t always write content that’s easy to digest, i.e. “listicles.” Sure, they’re easy on the eyes, but at the same time, search engines aren’t going to pick them up well since lists aren’t incredibly in-depth. So if you’re writing a list, keep in mind that they need to be deep and highly informative if they’re going to rank high on search engines.

Optimize for Mobile

Yes, in the year 2016, mobile optimization is more important than ever. More people are relying on their mobile phones to view web pages, so if your website looks unprofessional from a mobile standpoint, you can expect the user to avoid the site, which means you’re losing out on rankings. To increase your rankings on Google, simply optimize your website and pages for mobile. This includes increasing page speed via optimizing images, minimizing code and reducing redirects. You also need to ensure that all your content, including images, are able to be viewed. Moz offers plenty of tips and tricks to help you optimize your site for mobile viewership.

Mobile Vs. Standard
(Image Courtesy of Your Web Solutions)

Keep in Mind the Content’s Length

Yup, size matters nowadays when information is a-flowing. Bite-sized pieces are lurking among internet pages, but these pieces are falling behind on Google’s rankings. Nowadays, larger articles–those with a word count between 1,200 to 1,500–manage to find more traffic.  However, it’s important to keep in mind that great walls o’ text prove daunting for the reader, so it’s a good idea to break up longer articles with bullet points, images, videos and more. This type of formatting will make articles far easier to read; not to mention Google will love them because these articles contain far more keywords and images that benefit ranking. There is a second reason as to why Google loves longer articles: in the age of rampant social media, people are linking to longer articles more frequently, which raises the rank of a page.

Keep in mind though that the information in a long article needs to be relevant and chock full of information, of which the user will be able to digest and understand easily.

And that’s where we stop here. There are a few more tricks to keep in mind when delving into the world of SEO, so be sure to look out for them in Part 2 of this article coming next week.

Simple Image Rollover Navigation in JQuery

This tutorial illustrates how to create a simple Image Rollover Navigation in JQuery. I know, I know, why aren’t you using CSS for this?!

Well, there are just certain use cases out there that require images as I found out the hard way a few years back so I decided to post this article on how to set it up because sometimes you need a bit of code without loading in a massive JQuery plugin. I’m sure many of us have been there. Of course most JQuery Pro’s can tackle this without a sweat but for the JQuery Novice out there, this bit of code is for you.

First you’ll need some very basic HTML:

<ul class="nav">
    <li><a id="nav1"></a></li>
    <li><a id="nav2"></a></li>
    <li><a id="nav3"></a></li>
</ul>

Like most, I tend to build my menu’s using a list. But since we’re using graphics instead of CSS for our buttons, we need to assign ID’s to each link.

Here’s some CSS:

.nav li {
    display: inline-block;
    margin: 0;
    padding: 0;
}

.nav a {
    display: inline-block;
    cursor: pointer;
    height: 43px;  
}

#nav1 {
    background: url('https://googledrive.com/host/0B6JoOY-U2ZgaWHZnLVM0LXJsdXc/tab_help.jpg') no-repeat;
    width: 93px;
}

#nav1:hover {
    background: url('https://googledrive.com/host/0B6JoOY-U2ZgaWHZnLVM0LXJsdXc/tab_help_over.jpg') no-repeat;
    width: 93px;
}

#nav2 {
    background: url('https://googledrive.com/host/0B6JoOY-U2ZgaWHZnLVM0LXJsdXc/tab_product_info.jpg') no-repeat;
    width: 91px;
}

#nav2:hover {
    background: url('https://googledrive.com/host/0B6JoOY-U2ZgaWHZnLVM0LXJsdXc/tab_product_info_over.jpg') no-repeat;
    width: 91px;
}

#nav3 {
    background: url('https://googledrive.com/host/0B6JoOY-U2ZgaWHZnLVM0LXJsdXc/tab_ship_pay.jpg') no-repeat;
    width: 90px;
}

#nav3:hover {
    background: url('https://googledrive.com/host/0B6JoOY-U2ZgaWHZnLVM0LXJsdXc/tab_ship_pay_over.jpg') no-repeat;
    width: 90px;
}

Since we’re making our graphic rollover a background inside a link, the two most important things here are making sure the link is set to display: block and you’ll also need to define each link’s height and width to have the graphics show properly. Here, my menu had a uniform height but not so with the width. Depending on the graphics you use, this could be different.

Then your JQuery Image Navigation Rollover code:

$(document).ready(function() {
    // Click Event
    $('.nav a').click(function() {  
        // Grab value of id attribute
        var $id = $(this).prop('id');
        // Find the id dynamically and find the current bg image of the hover state
        var $hov = $('#' + $id + ':hover').css('background-image');
        // Set an inline style with the hover state's bg
        $('#' + $id).attr('style', 'background-image: ' + $hov).addClass('selected');

        // After selecting a new tab, iterate through prior tabs and remove their bg images
        $('.nav li').find('a').each(function() {
            if ($(this).prop('id') != $id ) {
                $(this).removeAttr('style').removeClass('selected');
            }
        });
    });
});

Basically we’re grabbing the ID of the link, pulling the :hover state and assigning it as an inline style for the clicked element. We then iterate through all links that don’t equal the clicked link and remove their inline style and class.

While there’s probably other ways this can be done, this was pretty simple and concise to me. Lastly, you can check out the working Demo in our JS Fiddle here.

This was tested and should work in JQuery 1.6 and above.